Setup checklist
Two steps are required before shoppers can buy from you. The rest make your shop easier to find and easier to buy from.
| Step | Where in your dashboard | Required? |
|---|---|---|
| Add a product or gift package | Shop > Products, or Shop > Gift Packages | Yes |
| Connect your payout account | Business Account > Payments | Yes |
| Verify your identity (NIN) | Verify Now button on your dashboard | Yes |
| Fill in your storefront and Custom Url | Business Account > Business Setup | Strongly recommended |
| Set delivery pricing | Business Account > Delivery Settings | Strongly recommended |
| Set business hours | Business Account > Business Hours | Recommended |
| Download your flyer and share your link | Dashboard | Recommended |
Until the required steps are done, your dashboard shows a Finish setting up your gift shop card. Each row has a button that takes you straight to the right page.
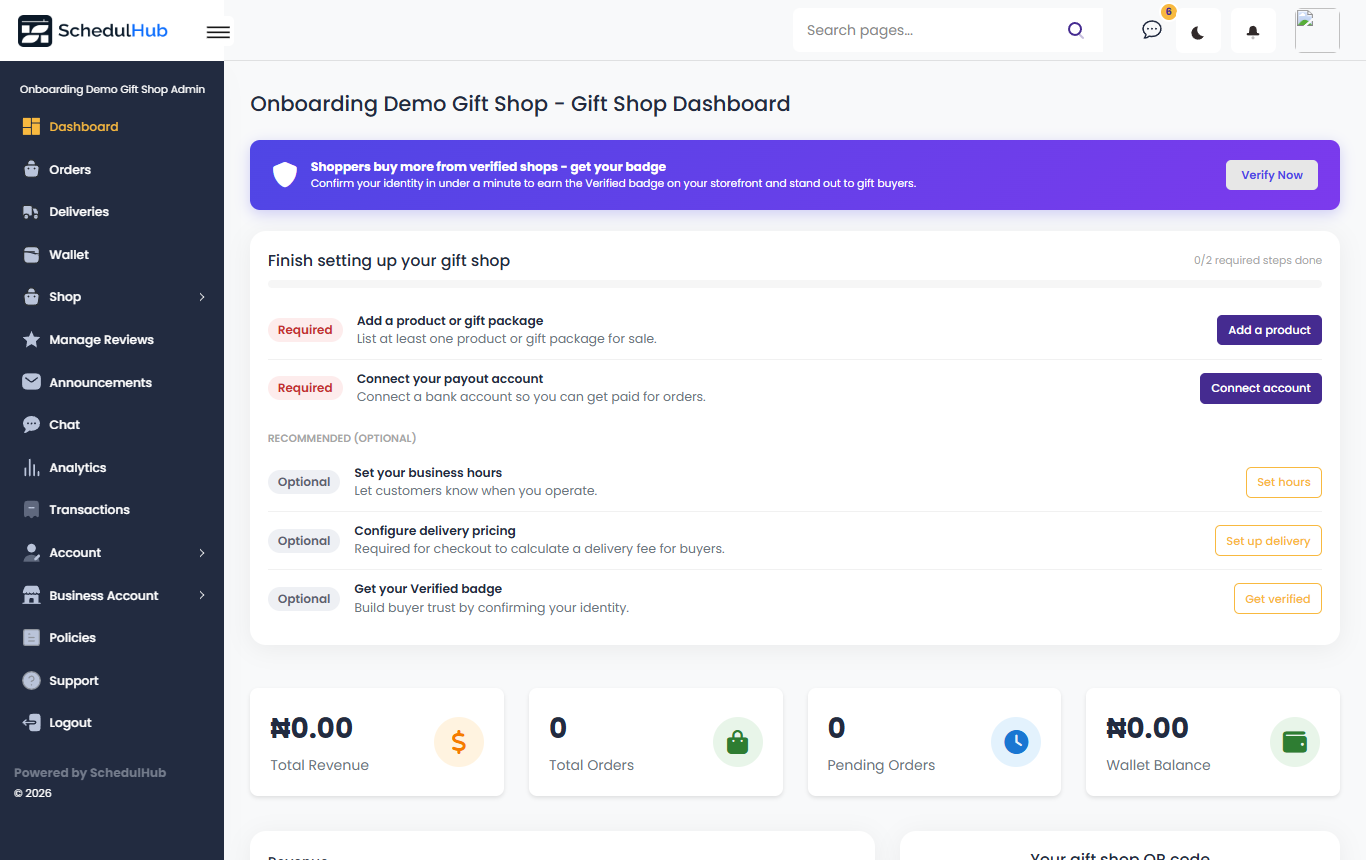
Create your account
One sign-up creates both your login and your gift shop.
- Go to List Your Gift Shop.
- Enter your first name, last name, email, mobile number and a password (twice).
- If you were referred by someone, enter their code in Referral code.
- Tick the terms box and click Create Gift Shop Account, or sign up with Google.
- Open the verification email and click the link. Check your spam folder if it is not in your inbox.
- Sign in to reach your Gift Shop Dashboard.
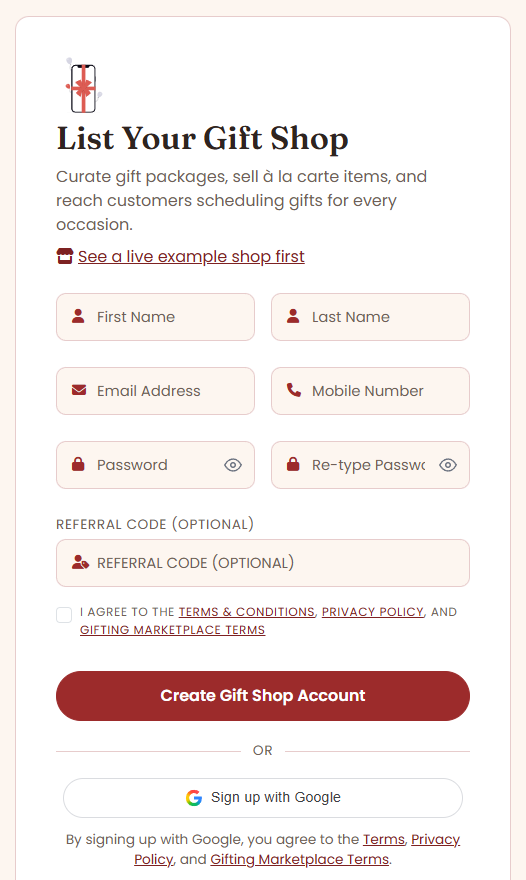
Verify your identity
Your shop can't go live until your NIN is verified. Click Verify Now on the banner on your dashboard. Enter your full name exactly as it appears on your NIN, plus your 11-digit NIN. Most vendors are approved within minutes, and verified shops show a badge to shoppers.
Set up your storefront
Your storefront is the public page shoppers land on. Set it up in Business Account > Business Setup before you share your link, because your logo, banner and Custom Url also go on your flyer.
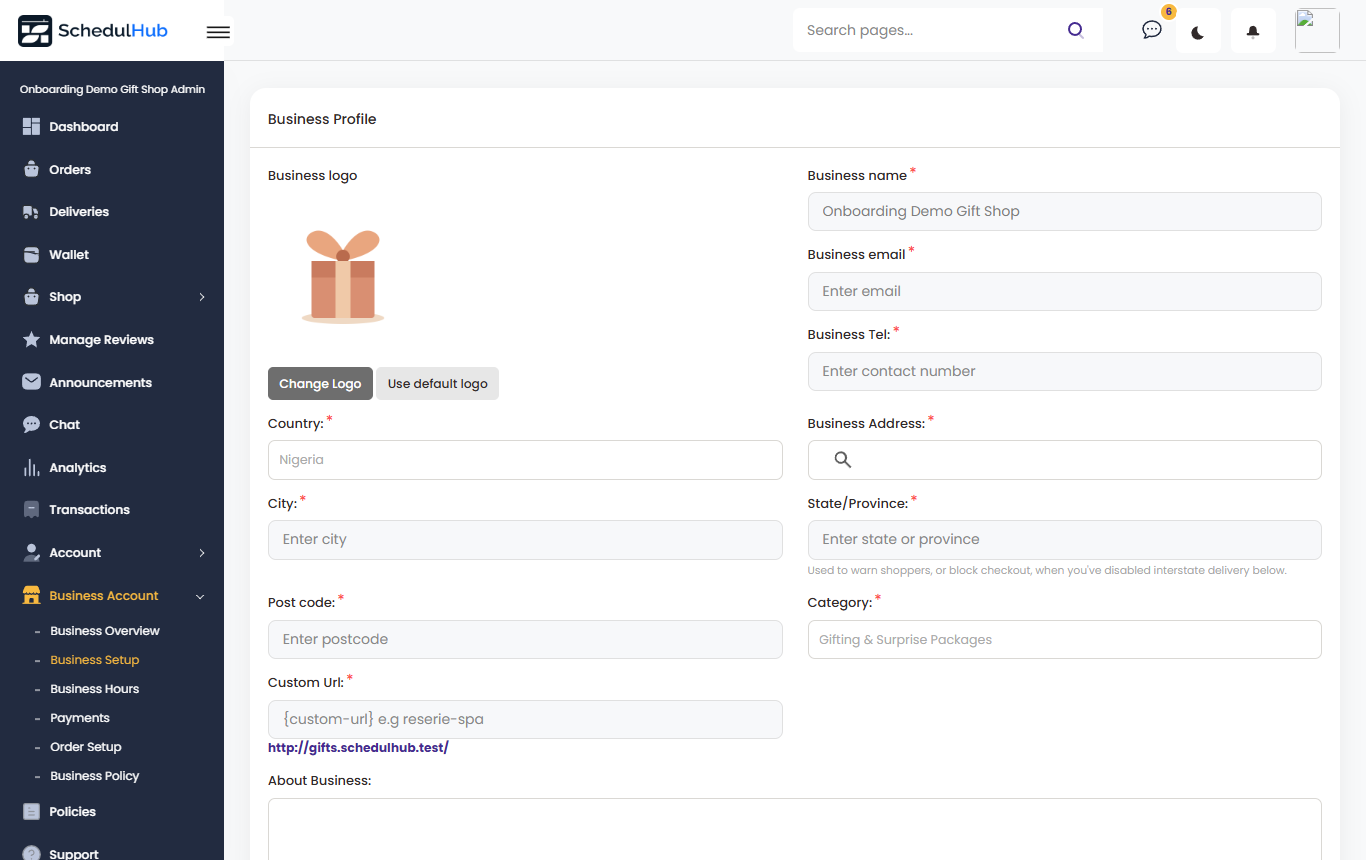
| Field | What to enter |
|---|---|
| Business logo | Click Change Logo. A clear logo on a plain background looks best. |
| Business name, email and Tel | Your trading name and contact details customers can reach. |
| Business Address, City, State, Post code | Your shop or dispatch location. Pick the address from the suggestions: delivery distances are measured from this point. |
| Custom Url | A short, lowercase name such as mide-surprises. This becomes your shop link. Shops without one are left out of Gifts browse. |
| About Business | What you make, areas you deliver to, and how far ahead people should order. |
| Shop Banner Image | Click Change Banner and use a wide photo of your best work. Keep text away from the edges. |
| Social Media Links | Instagram, Facebook, X and TikTok, shown on your storefront. |
Country and Category are fixed for gift shops, so they appear greyed out. Also set your Business Hours and Business Policy (refunds, cancellations, substitutions) under Business Account, and add photos of past work in Shop > Portfolio Gallery.
Add a product
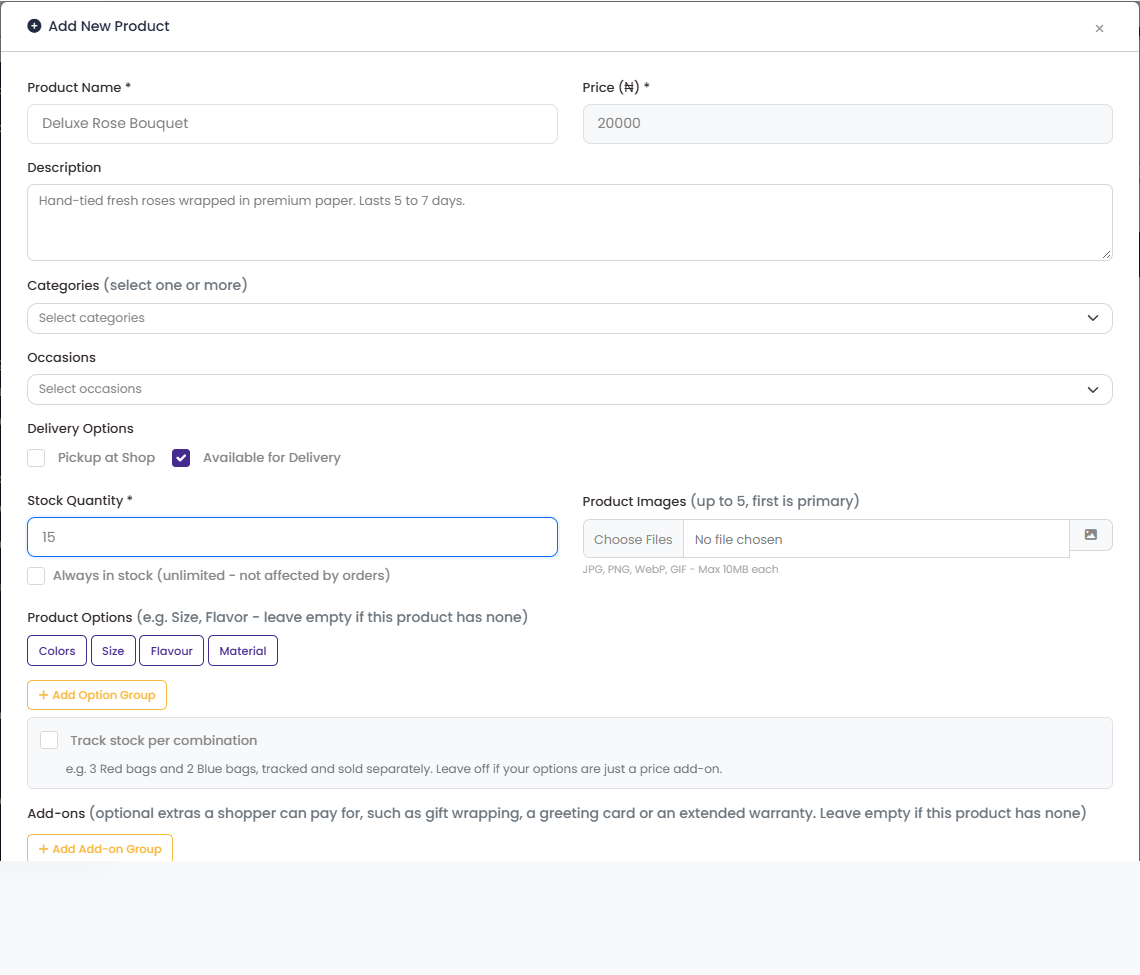
Go to Shop > Products and click + Add Product. Only the name, price and stock are required, but the other fields decide whether shoppers find and buy your item.
- Product Name: say what it is, e.g. "12 Red Roses Bouquet", not "Bouquet 1".
- Price: the price of the cheapest, default version. Options and add-ons are added on top.
- Description: what is included, size, how long it lasts, and how much notice you need.
- Categories and Occasions: tag every one that fits. Shoppers filter by both, so untagged products are hard to find.
- Delivery Options: tick Available for Delivery, Pickup at Shop, or both.
- Stock Quantity: how many you can sell. Tick Always in stock for made-to-order items.
- Product Images: up to 5 (JPG, PNG, WebP or GIF, max 10MB each). The first image is the main photo.
- Add Product Options and Add-ons if the product has them (explained below), then click Add Product.
Tip: after saving, click Edit on a product to set its Visibility to Hidden. Hidden products are off your storefront but can still go inside a gift package.
Gift packages
Shop > Gift Packages bundles your products into one item at its own price. You can add custom lines with no price or stock (e.g. "Handwritten card"), give the package its own delivery lead time, and tick Let customers customize this package so buyers can remove or add items while the price updates.
Low stock alerts
Click Low Stock Alerts on the Products page to get an email or dashboard notification when an item drops to a level you choose.
Options and option pricing
An option is a choice the shopper must make about the product itself, like size, colour or flavour. The price on each option value is the difference from the base price, not the full price.
- Under Product Options, click a quick button (Colors, Size, Flavour, Material) or Add Option Group to name your own.
- Click Add Value for each choice and fill in:
- Value: the choice, e.g. "Large".
- Price +/-:
0for the default, a positive number to charge more, a negative number to charge less. - Colour swatch (optional): shows a coloured dot for colour choices.
- Add as many groups as you need. Shoppers pick one value from each.
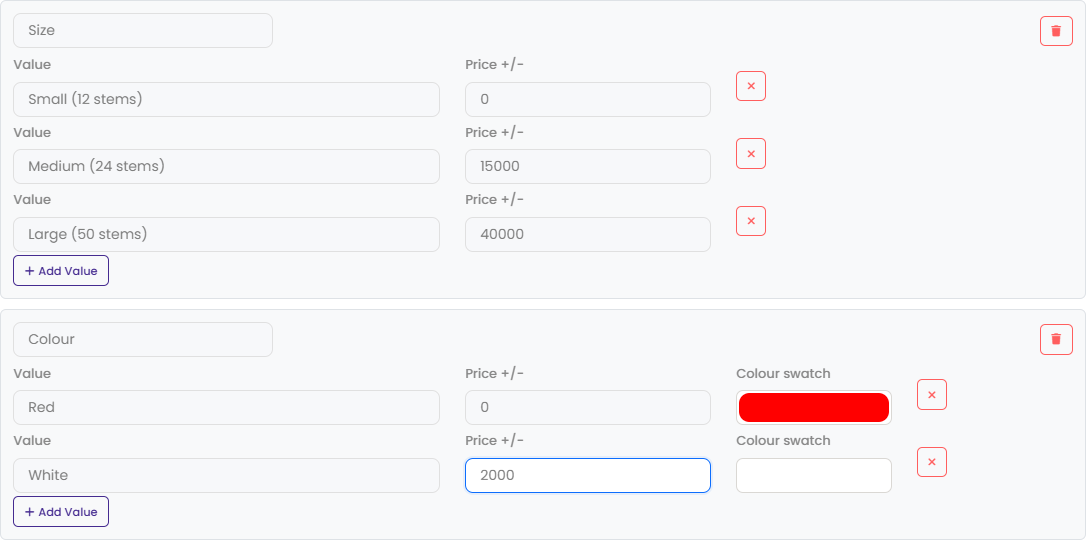
Worked example: rose bouquet, base price ₦20,000
| Option group | Value | Price +/- | Shopper pays |
|---|---|---|---|
| Size | Small (12 stems) | 0 | ₦20,000 |
| Size | Medium (24 stems) | 15000 | ₦35,000 |
| Size | Large (50 stems) | 40000 | ₦60,000 |
| Colour | Red | 0 | no change |
| Colour | White | 2000 | adds ₦2,000 |
Medium + White = ₦20,000 + ₦15,000 + ₦2,000 = ₦37,000.
The most common mistake: typing the full price into Price +/-. If Medium costs ₦35,000, enter 15000, not 35000, or shoppers are charged ₦55,000. Always set the base price to your cheapest choice.
Track stock per combination
Turn this on only if you hold separate stock for each combination, e.g. 3 Red and 2 Blue gift bags. Click Add Variant for each combination and set its Stock, Price adj., optional SKU and optional Image (so the photo changes when a shopper picks that colour).
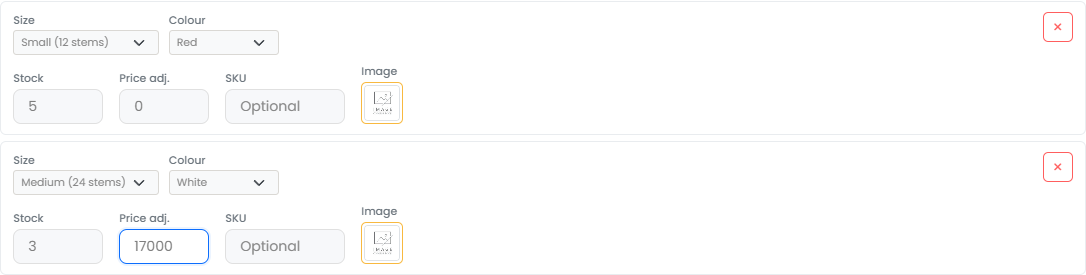
Important: with combination tracking on, shoppers pay the row's Price adj., not the Price +/- on the option values. New rows start at 0, so fill in Price adj. on every row that should cost more. If your options only change the price, leave this switch off.
Add-ons
An add-on is an optional extra the shopper can pay for, like gift wrapping, a greeting card, balloons or a teddy bear. Its price is added to the total when the shopper ticks it.
| Options | Add-ons | |
|---|---|---|
| What it is | A version of the product | An extra that goes with it |
| Must the shopper choose? | Yes, one per group | No, unless the group is Required |
| Price you enter | Difference from the base price | Full price of the extra |
| Example | "Large" +₦40,000 | "Teddy bear" ₦8,000 |
- Under Add-ons, click Add Add-on Group and name it, e.g. "Extras".
- Pick Multiple choice (shoppers can tick several; set Max selections to cap it) or Single choice (only one).
- Tick Required only if every order must include one, e.g. a free card where the shopper picks the design.
- Click Add Item for each extra and enter its name and price.
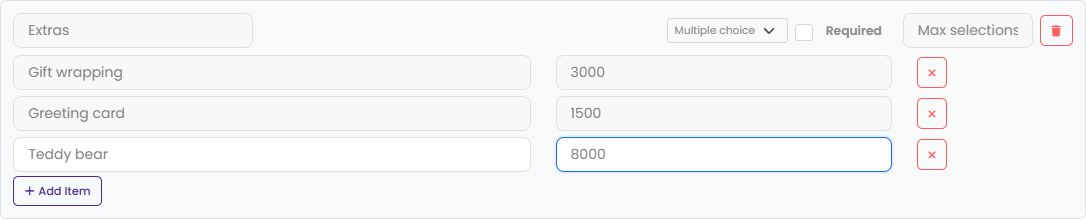
Bouquet (Medium + White) ₦37,000 + Greeting card ₦1,500 + Teddy bear ₦8,000 = ₦46,500.
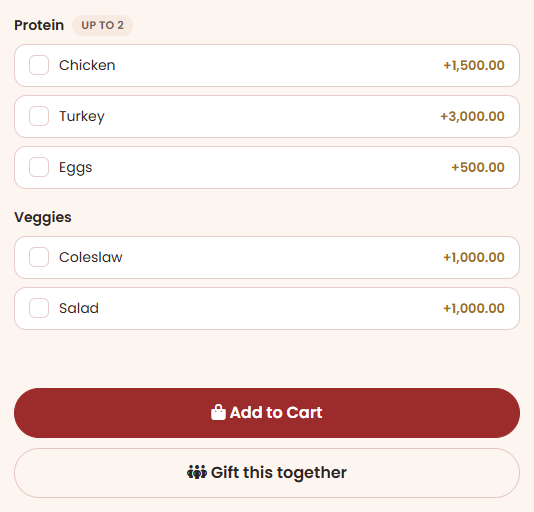
This is what shoppers see on your product page. "Up to 2" appears where you set Max selections:
Selling a card, or anything with writing on it? Add a Message field under Personalization on the product. Shoppers type their words when they add it to cart, and you see them on the order. The message box at checkout is different: SchedulHub emails that one to the recipient when you mark the order delivered, so you never need to print or include it.
Delivery
Set this up in Business Account > Delivery Settings before your first order.
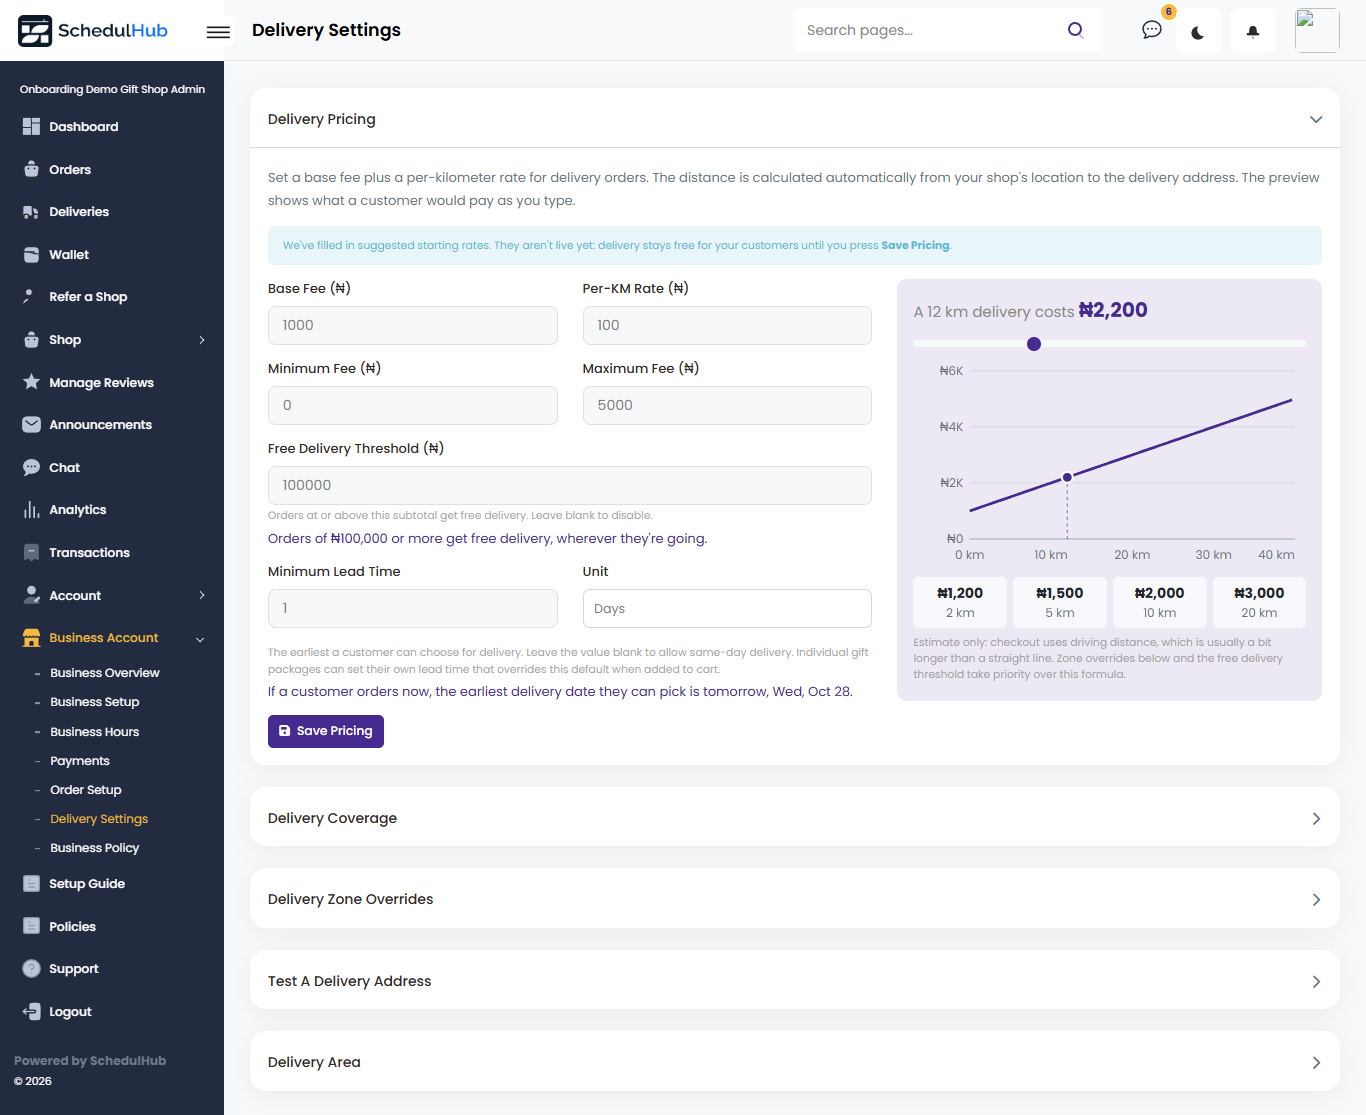
If you skip delivery pricing, checkout charges shoppers ₦0 for delivery and you carry the cost. The page fills in suggested starting rates for you, but they only apply once you press Save Pricing.
1. Delivery pricing
The fee is worked out from the driving distance between your shop address and the delivery address:
| Field | Example | What it does |
|---|---|---|
| Base Fee | ₦1,000 | Charged on every delivery |
| Per-KM Rate | ₦100 | Added per kilometre |
| Minimum Fee | ₦0 | Floor for short trips |
| Maximum Fee | ₦5,000 | Cap for long trips (blank = no cap) |
| Free Delivery Threshold | ₦100,000 | Orders at or above this deliver free (blank = off) |
| Minimum Lead Time | 1 day | Earliest delivery date a shopper can choose. Days count calendar days, so 1 day means tomorrow whatever time they order (blank = same day allowed) |
With these numbers a 12 km delivery costs ₦1,000 + (₦100 × 12) = ₦2,200, and anything past 40 km stops at the ₦5,000 cap.
The preview beside the fields shows what a shopper would pay as you type: drag the slider to any distance, or check the sample prices at 2, 5, 10 and 20 km. Once your shop address is set, Delivery Coverage shows the fee at each distance on a map.
2. Delivery zone overrides
Charge a flat fee for an area instead of using distance. Example: Zone Name "Lekki", Matches Locality/City "Lekki", Fee ₦4,000. It is matched against the shopper's delivery city, and zones are checked top to bottom, so the first match wins. Put specific areas above broad ones (e.g. "Victoria Island" above "Island") using the arrow buttons; the page warns you when a zone can never be reached. Type an area into Try a customer's city or area to see which zone it hits.
To check a real address end to end, use Test a Delivery Address. It runs the same calculation as checkout, using your saved settings and real driving distance.
3. Delivery area
Turn off Allow deliveries outside my state if you only deliver locally. Out-of-state shoppers are then warned and cannot check out. Fill in your State in Business Setup first.
4. Who delivers your orders?
- I deliver this myself: you or your rider deliver, then mark the order delivered.
- SchedulHub Delivery, powered by RouteLift: a rider collects from you and delivers. Available to Lagos shops, within your state.
A gift package can have its own Delivery Lead Time (e.g. 3 days for a custom hamper) that overrides your shop default.
Managing orders
Paid orders arrive in Orders as Pending. Each shows the items, options, add-ons, personalization, recipient, delivery date and time, and any note the shopper left for you.
- Pending: open the Action menu and click Confirm to accept the order.
- Confirmed: prepare it.
- Delivering yourself: deliver on the chosen date, then click Mark Delivered.
- SchedulHub Delivery: on or after the delivery date, click Request Delivery (on Orders or the Deliveries page), fill in package size, vehicle, delivery type, weight and dimensions, add a note for the rider if they need one, and submit. The rider sees only that note, never the shopper's note or personalization. The order marks itself delivered when the rider finishes.
- Delivered: the order is complete and its earnings start clearing to your Wallet.
| Action | When to use it |
|---|---|
| Email Customer | Ask a question or share an update, such as a substitution |
| View Receipt | Open the PDF receipt |
| Refund | Return part or all of a paid order |
| Mark Refund Sent | Confirm a manual refund transfer has been sent, with the transfer receipt attached |
| Cancel Order | Cancel a pending or confirmed order |
Set whether shoppers can cancel, the cancellation window, and your returns policy in Business Account > Order Setup.
Getting paid
Shoppers pay by card at checkout. Your share of each order collects in your Wallet, and you withdraw it to your bank whenever you like.
Connect your payout account
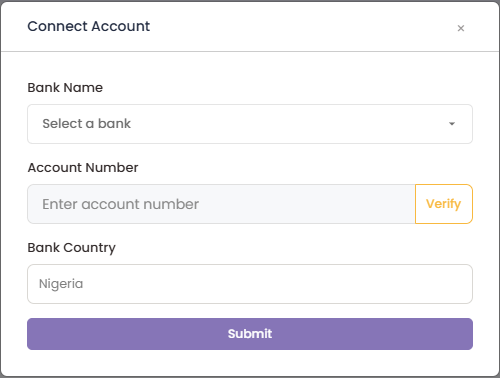
- Go to Business Account > Payments and click Connect Account.
- Pick your Bank Name, enter your Account Number and click Verify.
- Check the account name shown is yours, then click Submit.
- Set a 4-digit Withdrawal PIN. You need it for every withdrawal.
When money becomes available
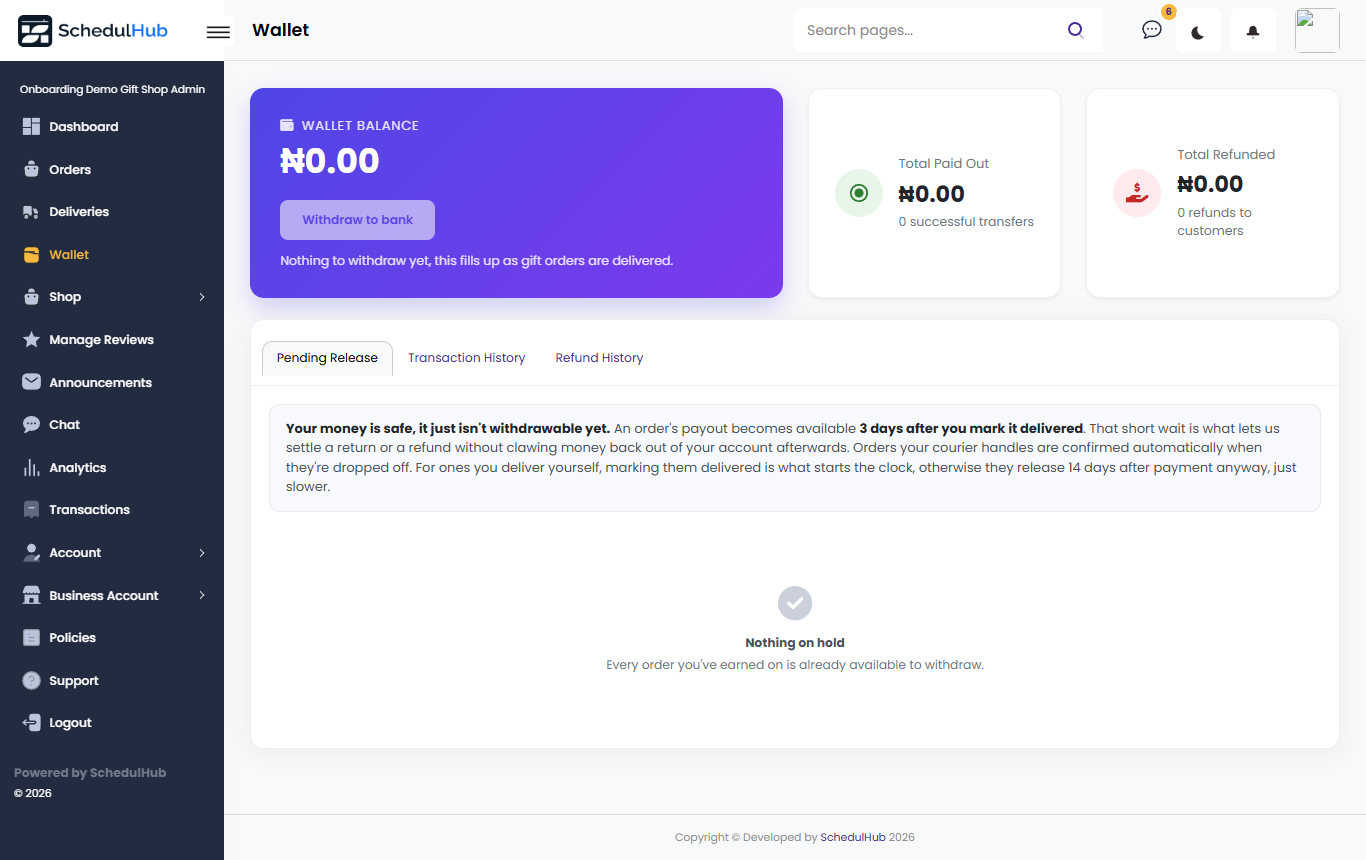
An order's payout becomes available 3 days after you mark it delivered. If you never mark a self-delivered order, it still releases 14 days after payment, just slower. The Wallet's Pending Release tab shows why each order is waiting:
| Label | Meaning |
|---|---|
| Mark as delivered | You have not marked it delivered yet. Click the label to do it. |
| Out for delivery | A SchedulHub Delivery rider has it. |
| Cancellation window | The shopper can still cancel under your Order Setup rules. |
| Clearing | The 3-day hold after delivery. |
SchedulHub keeps a commission and the card processing fee from each order; the rest is your payout. Transactions shows the full breakdown for every order.
Promote your shop
Download your shop flyer
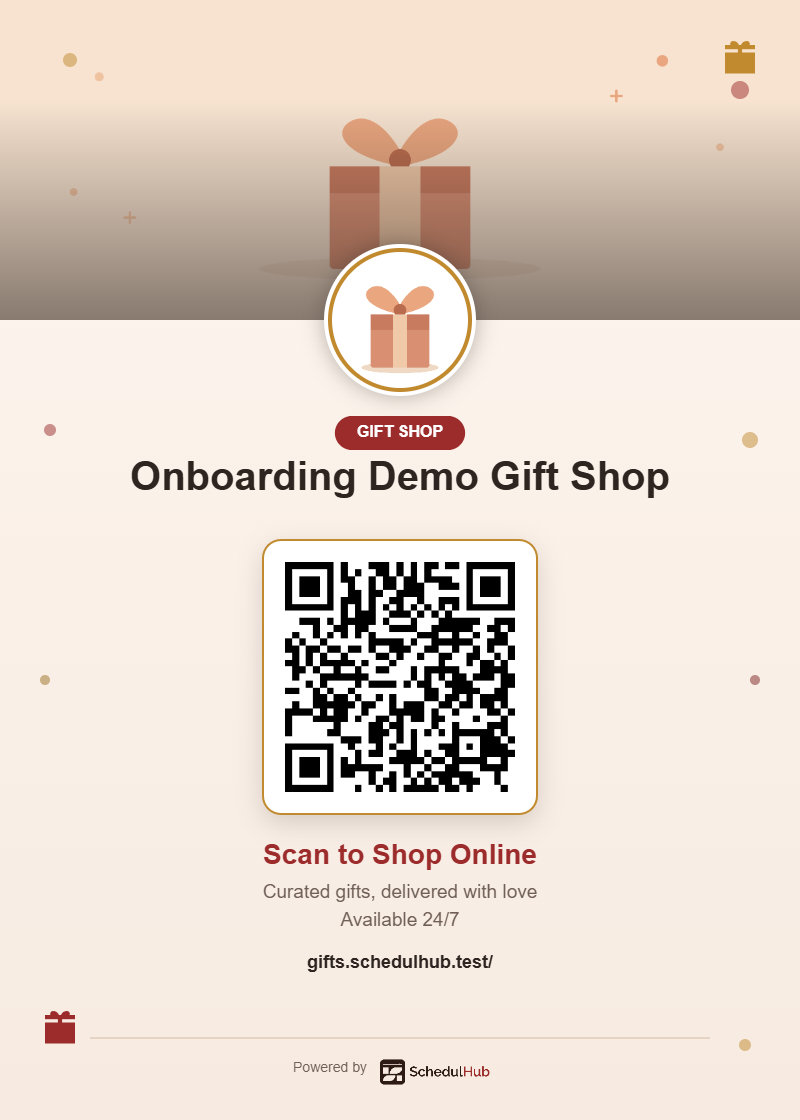
On your Dashboard, the Your gift shop QR code card has a Download Flyer button. It creates a ready-to-post image with your logo, banner, shop name and a QR code that opens your shop. Post it on Instagram and WhatsApp Status, print it for your counter, or tuck it into every delivery so recipients become customers.
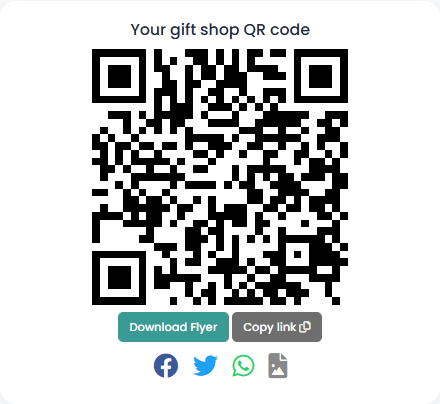
- Copy link copies your shop address for your bio and chats.
- The Facebook, X and WhatsApp buttons share your link with a ready-written message.
- The picture icon shares the flyer image straight to apps on your phone.
Before downloading, upload your logo and banner and save a Custom Url in Business Setup. Without a Custom Url, the QR code opens the Gifts home page instead of your shop.
Discounts and coupons
- Item Discounts put a sale price on a product or gift package, with optional start and end dates. No code needed.
- Coupons are codes entered at checkout, e.g.
MOTHERSDAY10. Set a maximum discount, minimum order, total uses, uses per customer, first order only, and which products it covers.
Gift vouchers
Add voucher amounts in Shop > Gift Vouchers (e.g. ₦10,000 labelled "Birthday") that people buy for someone else to spend in your shop.
Get Featured
Shop > Get Featured puts your shop first in Gifts browse and search, with a Featured badge.
Other dashboard tools
| Tool | What it is for |
|---|---|
| SchedulHub Assistant | The chat bubble on every page. Ask how to do anything, or what is left to set up. |
| Chat | Message shoppers who contact your shop. Quick replies win sales. |
| Manage Reviews | Read reviews and post a public reply to each. |
| Announcements | Email all or selected customers, e.g. "Valentine's orders close Friday". |
| Analytics | Sales, top products and trends. |
| Transactions | Every payment with its fee and payout breakdown. |
| Support | Raise a ticket with the SchedulHub team. |
Troubleshooting and FAQ
- Shoppers can't find my shop.
- Add at least one product, connect your payout account, and save a Custom Url in Business Setup.
- A shopper was charged the wrong price for a size.
- Price +/- must be the difference from the base price, not the full price. If Track stock per combination is on, check each row's Price adj.
- My delivery fee shows as ₦0.
- Delivery Pricing has not been saved, or the order passed your Free Delivery Threshold.
- Checkout says delivery is unavailable.
- Your shop address was typed instead of picked from the suggestions. Re-select it in Business Setup. If out-of-state delivery is off, shoppers outside your state are blocked too.
- A product doesn't appear on my storefront.
- It is Hidden or out of stock. Edit it and check Visibility and Stock.
- I can't request a rider.
- SchedulHub Delivery is Lagos-only for now, the order must be Confirmed, and you can request it from the shopper's chosen delivery date.
- My Wallet shows ₦0 but I have orders.
- Payouts become available 3 days after an order is marked delivered. Check the labels on the Pending Release tab.
- My flyer's QR code opens the Gifts home page.
- Save a Custom Url in Business Setup, then download the flyer again.